Yesterday I reviewed the Örb wars 2 tournament. (spoiler: great time) and today I’ll be looking at my armies’ performance. I played 6 games over the two days, 4 using the tournament army below and 2 using my Basileans. In this blog post, I will focus on the tournament army, with maybe a short notion on the 2 bonus games.
The army
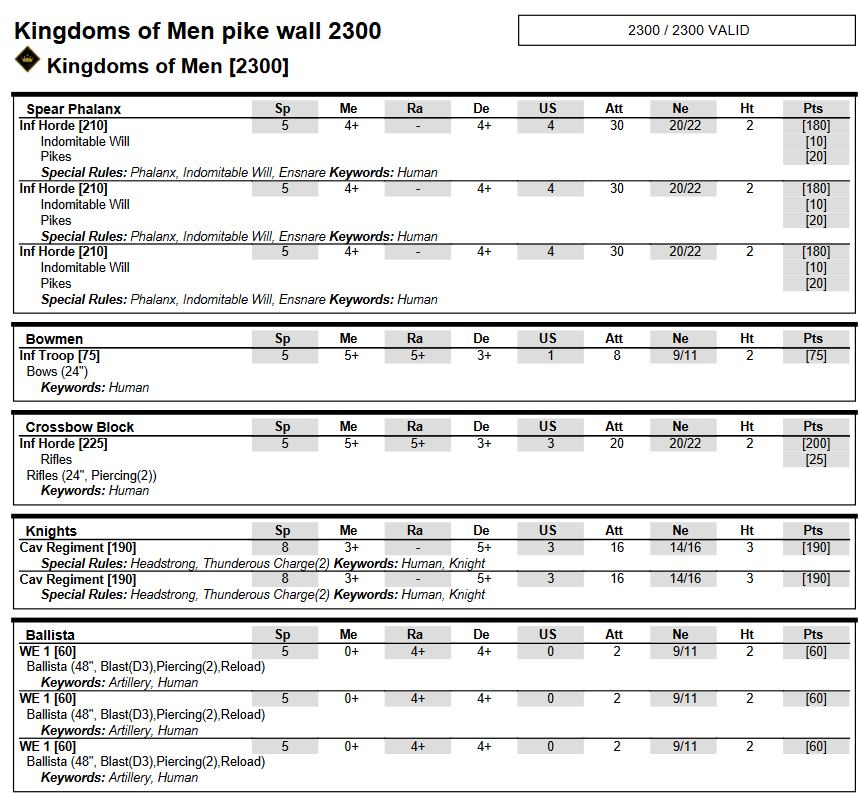
I created this army because -after the recent phalanx buffs- I thought the pike-and-shot army could be viable again. The idea is to have three separate parts of the army that my opponent needs to do deal with correctly or it can win the game. The three parts are:
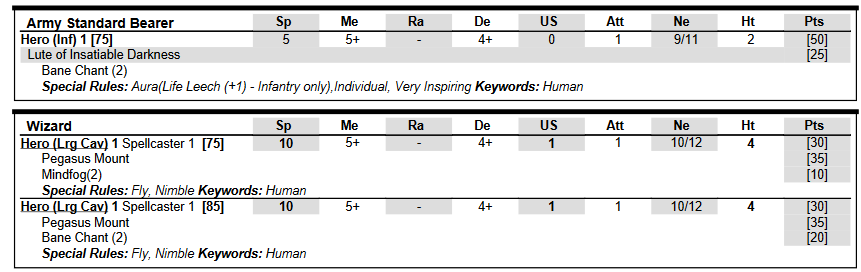
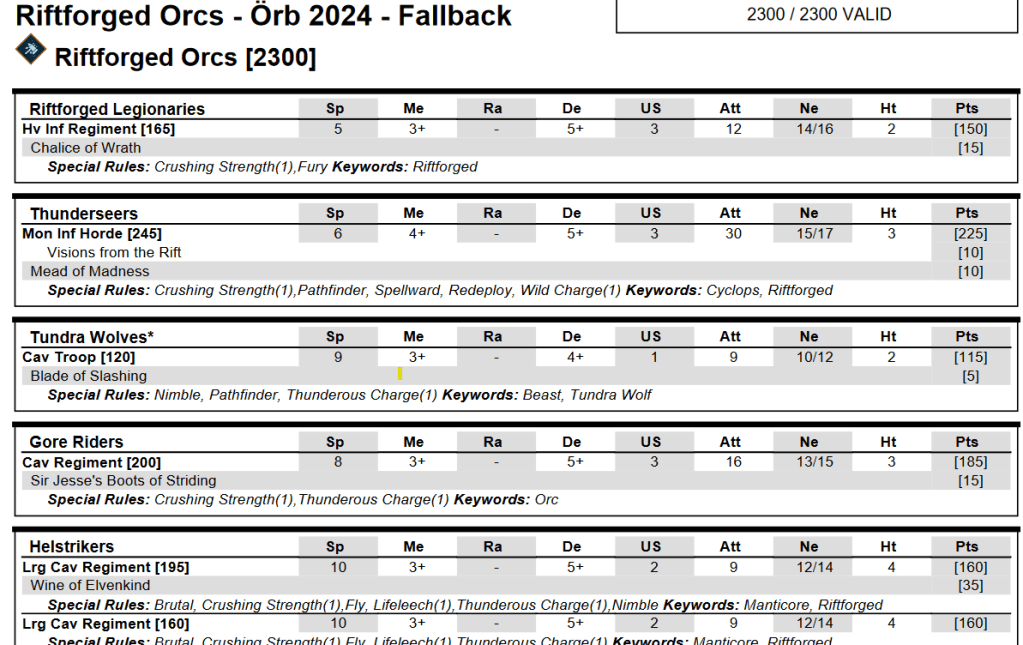
- a moderately powerful shooting contignent. Three balistas can do some damage (4+ to hit, blast d3 and piercing 2 average 1,3 damage vs def 5+ per balista. Their role is to destroy chaff (especially gargoyles, pegasi and similar stuff) first and foremost and after that to put pressure on heavy hitters. The horde of arquebussiers (I’m not gonna call them rifles, rifles were a 19-th century invention) is a big block of nerve that has to be dealt with. The wizard’s mind fog is a surprisingly useful addition to this force, either forcing a nerve check or adding shattering is far more useful that you’d think. the 75 points left over went into another troop of bowmen which was just a bit of unit strength that could add to the shooting barrage and take a wound or to before fleeing the field.
- 3 hordes of 22-point nerve with phalanx ánd ensnare are a hard counter to 50% of the games’ heavy hammers. (if you got either fly or ride something, you don’t want to fight these guys). With a bit of careful planning, they can hold their own against most infantry hordes too, even an impressive unit of reborn legionaries will hit on 5+ when hindered AND fightning Ensnare. If you get into a grind with them, those 3×30 attacks supported by bane chant will do some damage. The two wizards can position themselves to block their flanks.
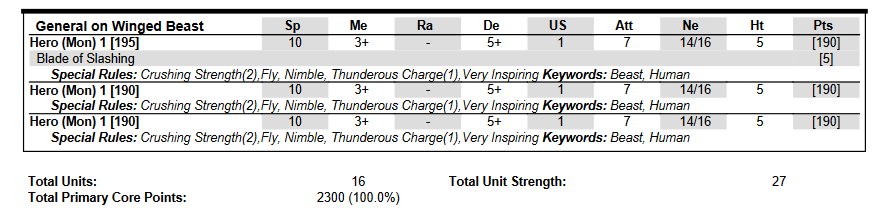
- 5 mobile medium hammers that can do some damage (18 attack knights and 7 attacks fliers) but combined or facing flanks/rears they can kill strong units.
The fact that there’s three parts in the army that have to be dealt with correctly makes it a tough army to face. Here’s them in their pre-game ensemble:


Arquebussiers / crossbowmen
The unit that needs some explanation is the full horde of upgraded crossbowmen. This is a unit that is objectively sub-optimal. The unit is not *good* or point efficient, especially compared to options that other armies have. Their average damage against def 5+ (even when not moving) is 4-and-a-bit which is abysmal, especially considering their 225-point price tag. When moving, facing cover or stealth, the damage becomes nearly non-existent.
I’ve playtested some alternatives (wizard with lighting, cannon, siege artillery) but in the end the combination of 20/22 nerve, 3 unit strength and horde level unlocks won out. That and the possibility of them actually being awesome (which they do once in a while) won me out. In this tournament they won me 2 games, which I will show later.
That said, in a game featuring allies, I’d gladly swap them out for a horde of elven achers or two regiments of naiad heartpiercers. These units do everything above *and* do reliable damage!
Battle one against Martin’s riftforged Orcs

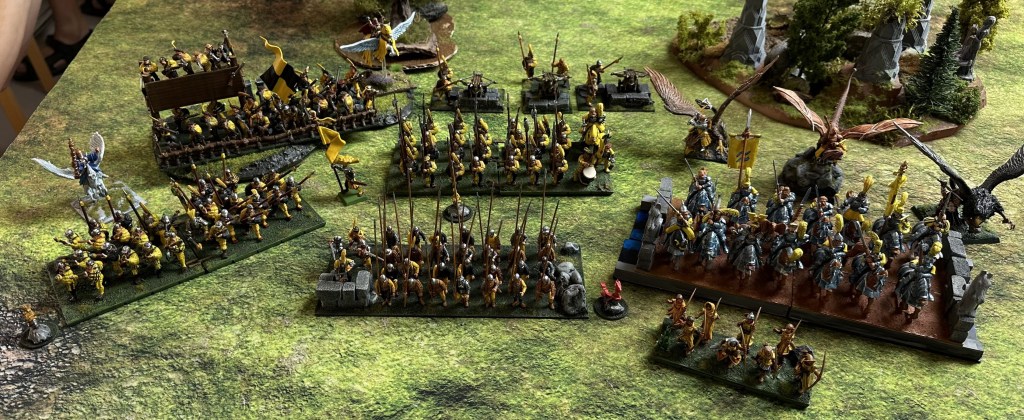
Martin chose an infantry heavy riftforged orcs list.
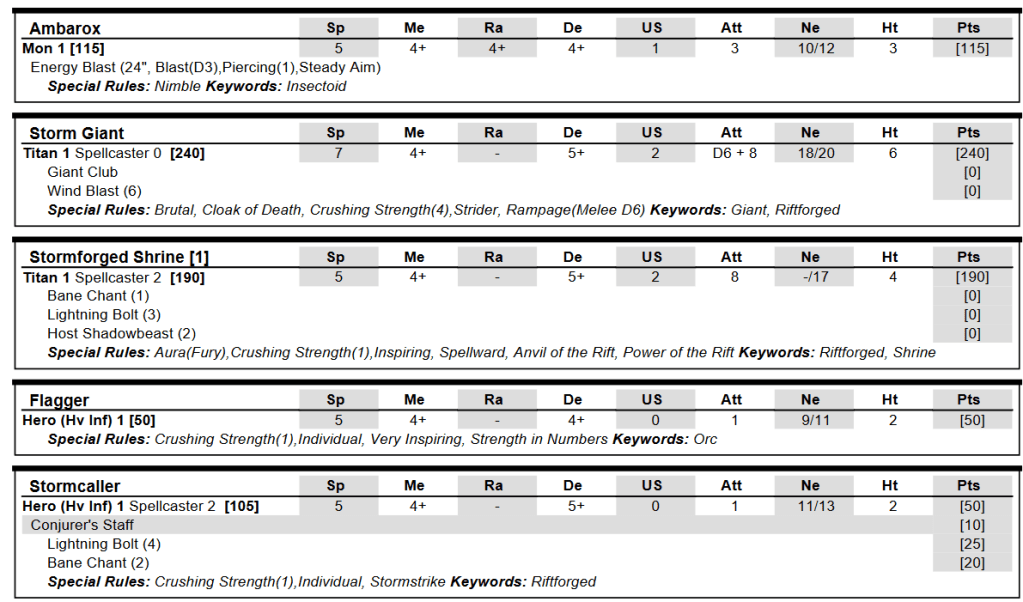
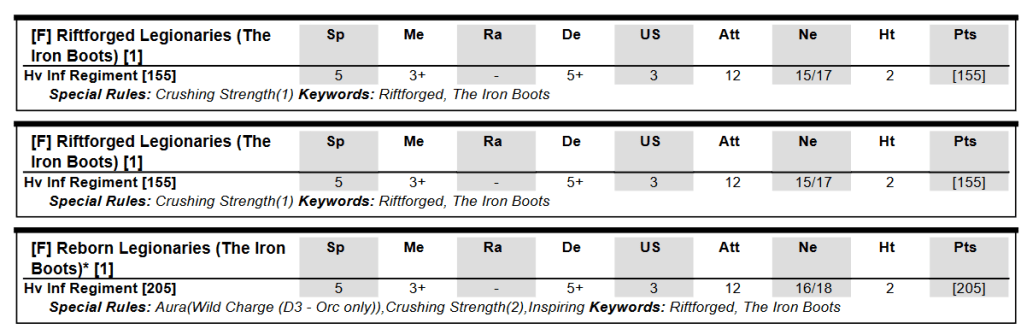
The army has 4 regiments of infantry (one plus the formation) plus the thunderseers to do the heavy lifting supported by quite a bit of lightning bolt, some fast elements and a giant. The game was invade.
The table had two pieces of impassable terrain which allowed me to field my infantry precisely in between. (a building on his half – far right on the picture) and an impassable wood on my half of the the table. This allowed me to protect my flanks well enough and my shooting advantage forced him to come to me.
After a bit of shooting, I marched my pikemen just enough so that the most of his charges would be hindered and waited for the carnage to come. When the inevitable charge came, each of my flying generals took a flank each, my knights flanked the giant and the game was over by turn 4.
On both flanks, the cavalry duel came to end in turn 2 with me as the winner. It turns out that hellstrikers cannot see past a pegasus, while my general on flying beast can see over a hellstriker. On both sides, the knights got the first (and second) charge, having dispatched the enemies just in time to join the melee in the middle.
all-in, the game was a classical demonstration of hammer-and anvil, but made possible due to the inexperience of my opponent. As said before, Martin’s a great guy and I feel a bit sorry to open the tournament with my well-tuned machine of war against his casual army.

How Martin could have won?
First of all, four regiments of infantry is too many. I would have switched out the 4th to upgrade the tundra wolves into a regiment and take a mounted individual as flier defense. These upgrades would have supported this army more than a 4th regiment of heavy infantry.
Secondly, if Martin would have combined his shooting/lighting in one part of the board, he could have applied pressure there. If the stormcaller/shrine/ambarox would have focussed fire on my wizards and then generals, he would have hampered my flying department quite a bit. Then, advancing one more turn with his infantry so his initial charge would not be hindered, might have made this more efficient so he could have killed at least one more horde on the go.
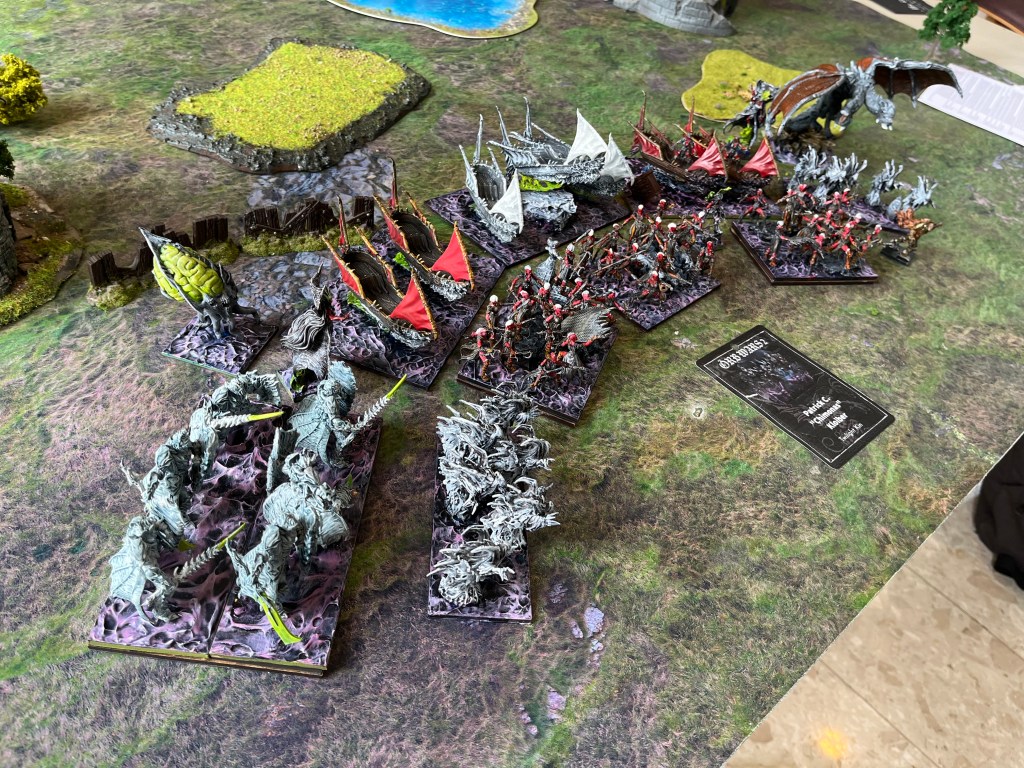
Battle 2 vs Floriant Wolf’s Order of the not-so-saint Lazarus
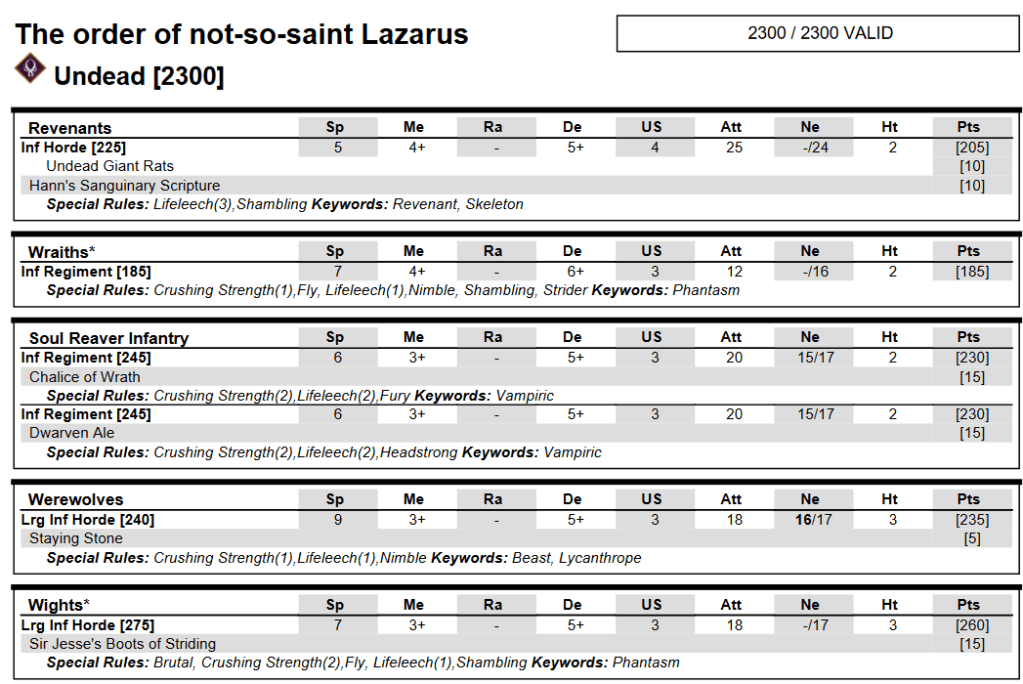
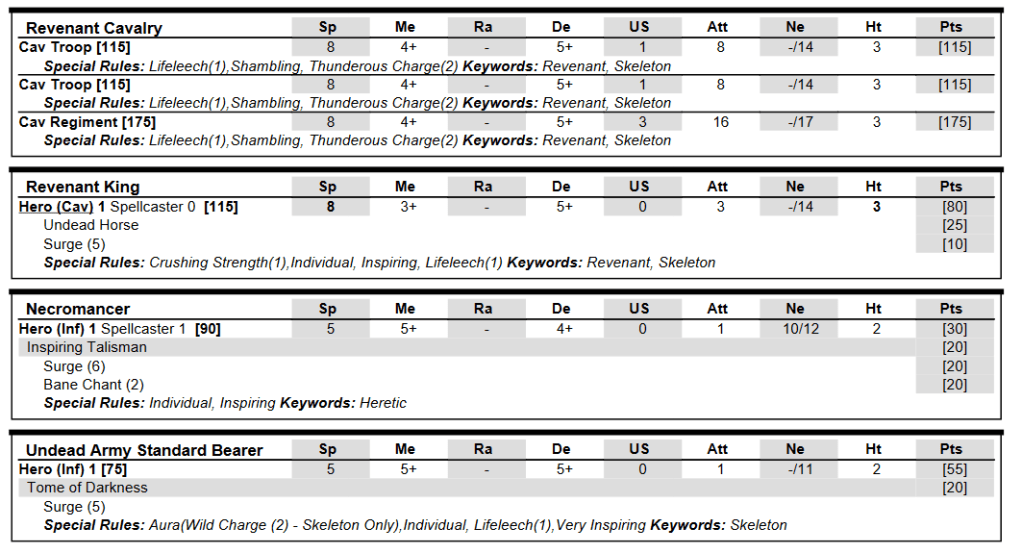

The battle against Florian was hugely enjoyable. His undead force is hard hitting, has both fast and resillent units and has the possibility to surge a unit further than you’d think with the combination of four surgecasters, totalling surge (21). Having a 5+ defense / 24 nerve block with life leech (3) makes for a hard to shift anvil.
The scenario was Raze, we distributed the tokens fairly even over the battlefield, with most of them gathered in the centre third and a single one on the far right of the battlefield.
Florian put most of his strength on the right side of the battlefield (his left) and I countered with a single balista and several mobile units. The far left was just his werewolves countered by my unit of knights supported by a wizard and my troop unit of bowmen.
As I ignored the right side of the board, I had plenty of power for the centre. I deployed two hordes pikemen, most of my generals, the 2nd unit of knights and the arquebussiers. Florian countered with his soul reavers, shielded with revenant cavalry. A very predictable tactic. My last unit of pikemen were kept in reserve to guard for unwanted flank attacks from the ignored flank.
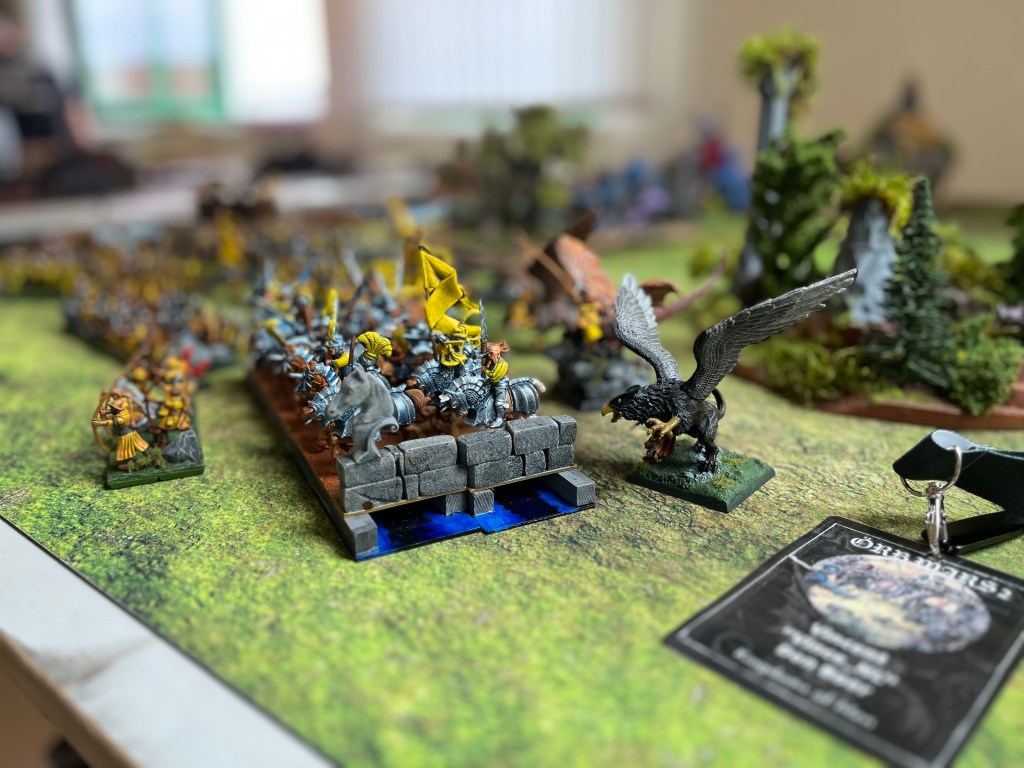
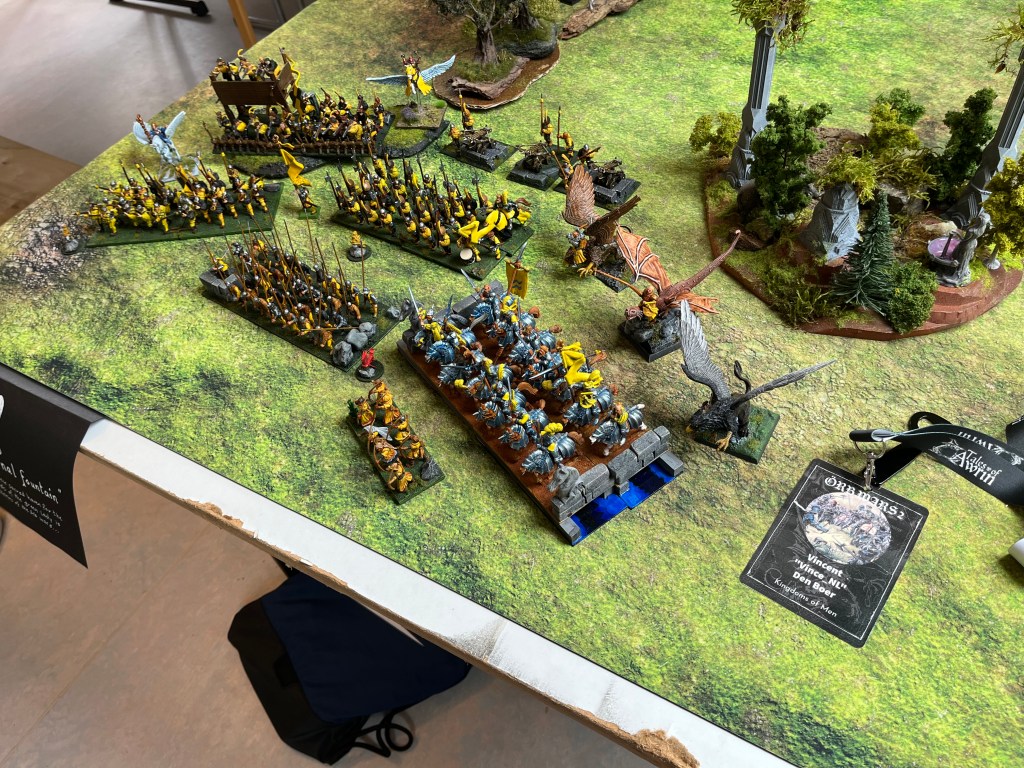
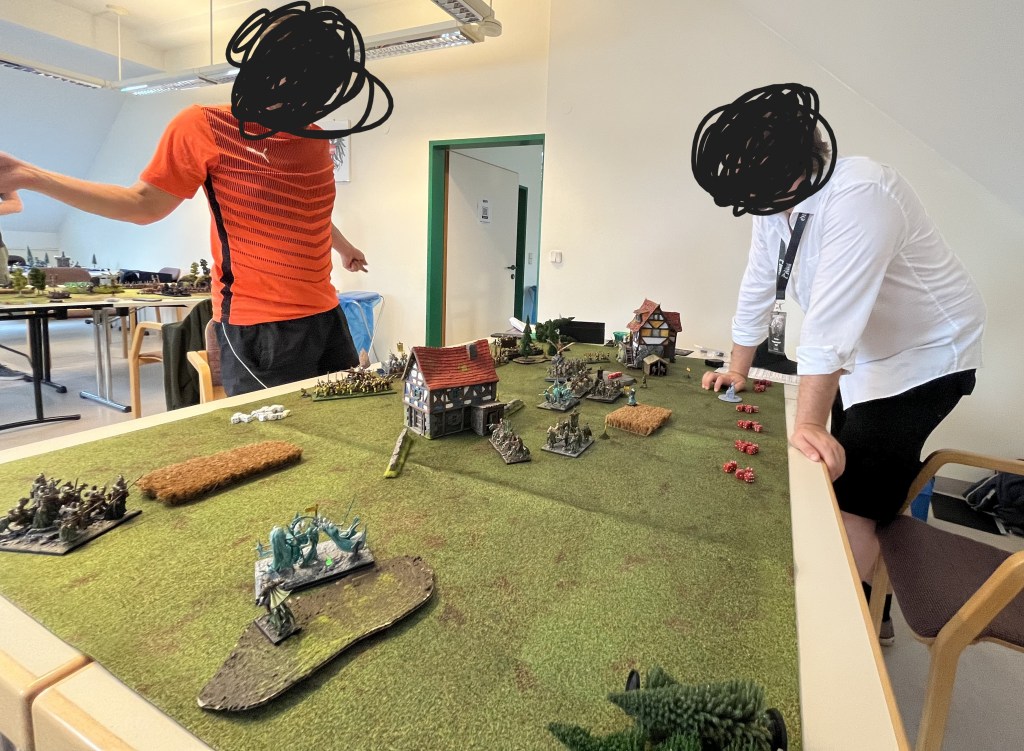
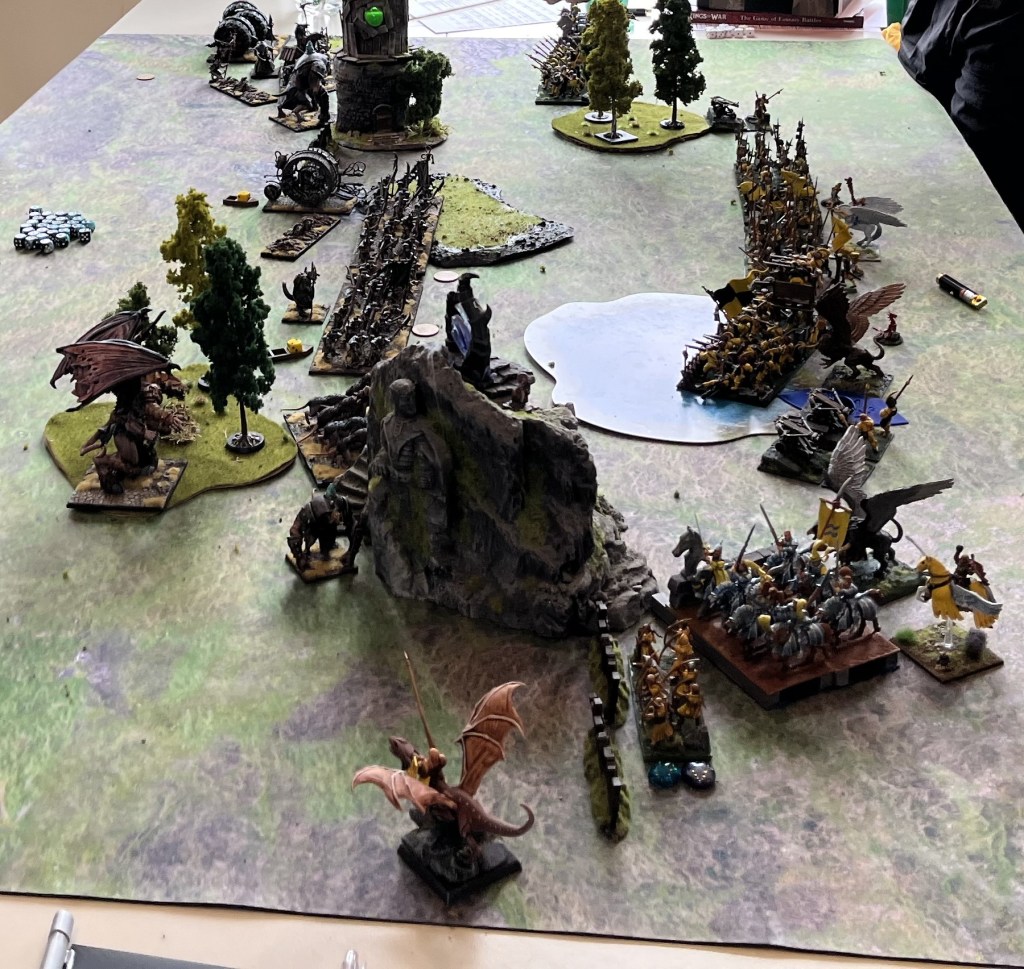
The battles on both flanks proceeded as planned. On the left, werewolves could not cope with knights with a bowmen and pegasus screen and were destroyed after they massacred the bowmen. On the right, after the general and 2nd pegasus withdrew, the lone balista distracted the cavalry for a turn. The remaining 2 units of hitters (wights and revenants) would not leave their token unguarded to fight through a horde of pikemen. The picture below shows the battle during Florian’s turn 3, as you can see his units dominate the right (near) flank but my pikemen guard the only way towards my centre. (Florian wears white, yours truly Dutch orange)
In the centre, things did not go as planned – in a good way. In turn 1 Florian marched his revenants 1 inch on top of the hill, right in sight (and range) of my arquebussiers. The combined might of the gunners and 2 balista’s totalled to 13 (!) wounds! I did not kill them this turn (I needed and 11 to rout), but next turn they would be destroyed regardless.
This, combined with the fact that I already outnumbered him in the centre, gave me the opportunity to deal with his units with relative ease. A honourable mention goes to his soul reavers which destroyed a horde of pikemen each, but in the end I outnumbered him almost 2:1 in this part of the battlefield which gave me the victory.
What could Florian have done to defeat me?
First of all, I like the army list, but it features almost 500 points (490 to be precise) in non-scoring individuals. Sure, Morgoth is good, but I think the battle would have been a lot different if he whould have been switched for a 3rd regiment of soul reavers or 2nd horde of wights.
Secondly, if you employ mostly shambling units and have only 13 units don’t put all your strength on the far flank. In that case, you cannot move your units fast enough to another part of the battlefield. If Florian would have switched out the werewolves and the wights, the battle may have been very different.
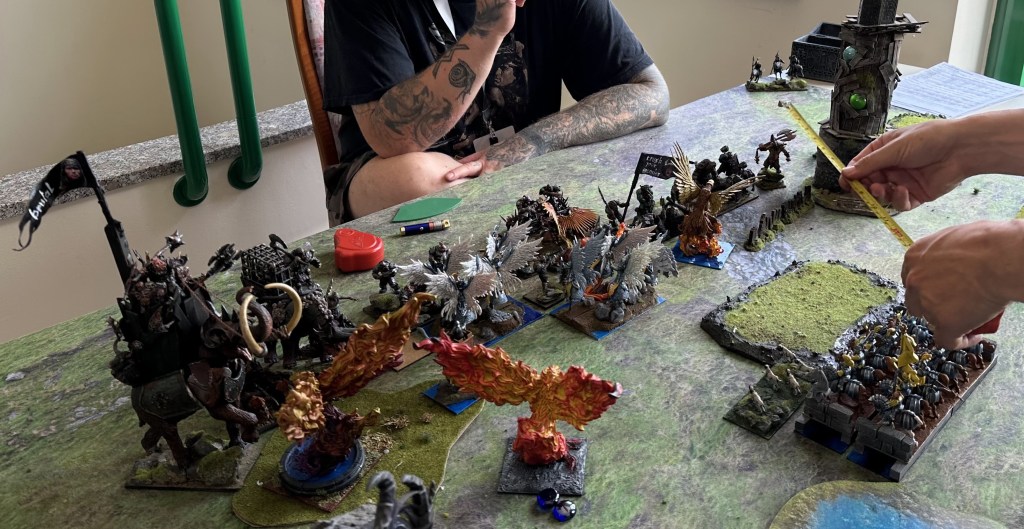
Battle 3 vs Markus’ Ratkin
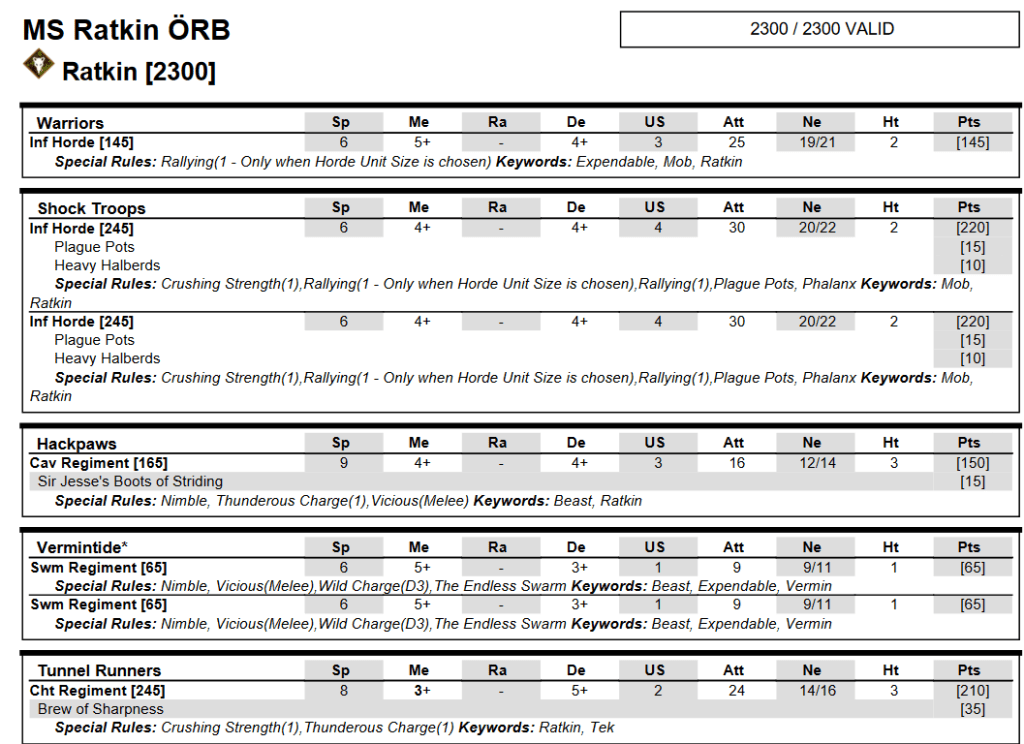
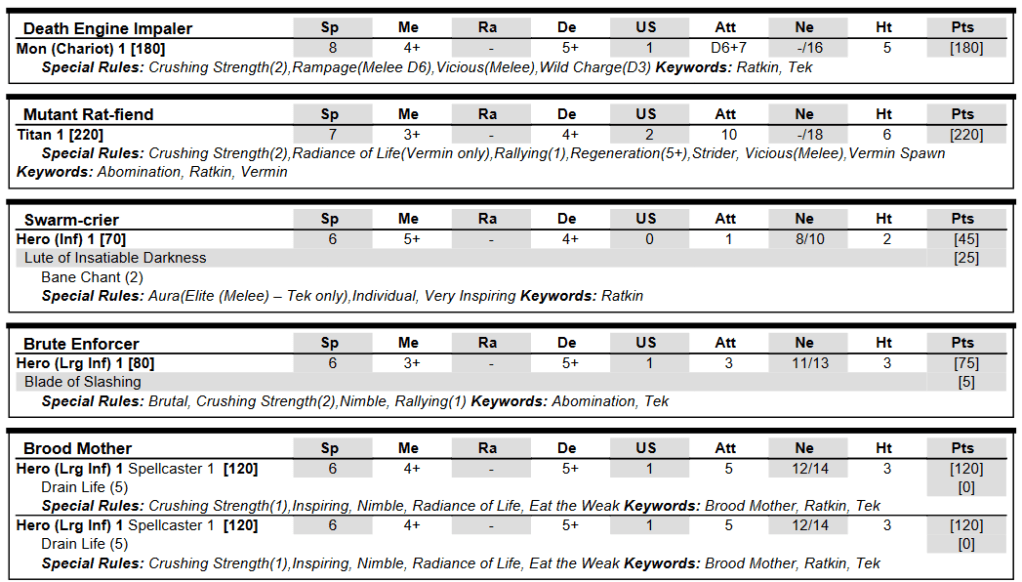
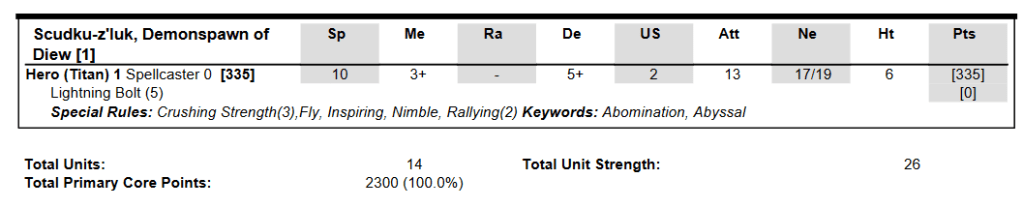
Markus runs a tight ship with three hordes and a heavy hitting unit of tunnel runners supported by a dragonesque demon-spawn and the mutant rat fiend.
Scenario: Pillage.
Like the previous battle, I deployed most of my infantry in the centre, a unit of knights supported by the bowmen and a couple of flying heroes on the left (facing the rat demon and the enforcer) and a unit of pikemen and a knight regiment on the far right. (facing the warrior horde and tunnel runners).
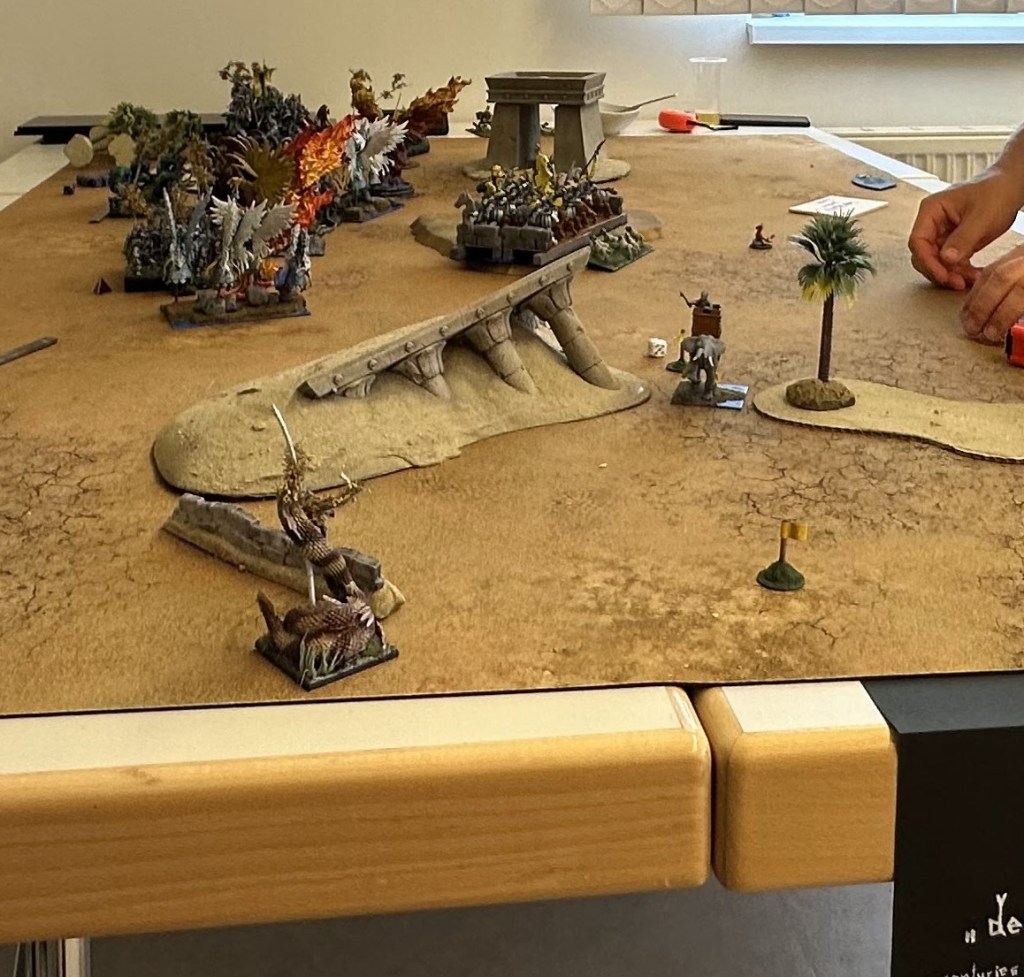
In the first turns, Markus outmanouvred me on the far left, redeploying his ratdemon to the centre while leaving my knights stuck on the far left in combat with the enforcer. On the far right, the knights and pikemen held the board. This left the field like this just before my 2nd movement:
Markus accepted a (hindered) flank charge from a general on winged beast, taking only a wound or two due to bad rolling on my side. The hackpaws were blasted away by my handgunners and my bowmen tried to block the enforcer (but I failed to remember it was nimble, so it could charge my knights regardless)
Turn 3 saw a charge from the rat demon into the flank of my handgunners (which, in hindsight, it could’t have made since it lost both flying and nimble). Luckily for me, the rolling was below average and it got stuck there, prompting a rear charge from another general-on-beast, dispatching it this time. The demon’s charge was supported by the death engine impaler which charged the 2nd horde of pikemen. The engine did a few wounds and was subsequently flank charged by the other pike-horde and killed. One of the shock troop hordes was then flank charged by the 3rd general on-winged beast. This left the centre pretty disordered and after another turn (in which the shock troops did kill a unit of pikemen) most of the ratkin were taken care of. Most, you say? Yes, the 2nd horde of shock troops survived twice (turn 4 and turn 5) on a double one, taking two more of my units with it. This left me just the generals and one horde of pikemen to claim the centre.
On the near flank, the enforcer stalled the knights for a turn before being killed by them. The knights claimed their table quarter. the bowmen took a 2nd. None took further part in the battle.
On the far flank, the mutant rat fiend charged the pikemen, leaving no space for the knights to flank it. The next turn, the pikemen withdrew 2.5″ and created the space for a flanking manouvre from the knights, dispatching the beast. Subsequently, the knights were charged (and destroyed) by the tunnel runners which were then charged by the pikemen. The tunnel runners, being chariots instead of cavalry survived and then took the pikemen in one go (lucky one that one) and contested that table quarter.
The 6th turn consisted of manouvring. A general on winged beast sacrificed himself to keep the remaining rat kin on the right 3rd of the table, two pegasi claimed the centre of my opponents’s half of the table, leaving me with 5 points (both centre thirds and the left third of the table) and Markus with 2. (both halves of the rightmost 3rd)
what could Markus have done to beat me.
I’m not entirely sure. The charge with the rat demon was a calculated risk and if he would have destroyed the handgunners, he still would be sandwhiched between two generals on winged beasts of which at least one would have had a flank. His army just wasn’t able to deal with the 3x 22 points of ensnare nerve supported by 3 flying heroes.
That said, the army has a lot of support compared to the quite limited amount of damage potential. Aside from the tunnel runners (14/16 def 5+) and the hackpaws (12/14 def 4+) the damage comes from two anvil-esque hordes and two square based monsters.
The tournament result
Winning 3 and losing zero makes for a good tournament result. It’s a pity Patrick won “better” and took the first place, leaving me second. You can see the results here, he killed almost1,000 points more than me. Congrats, Patrick!
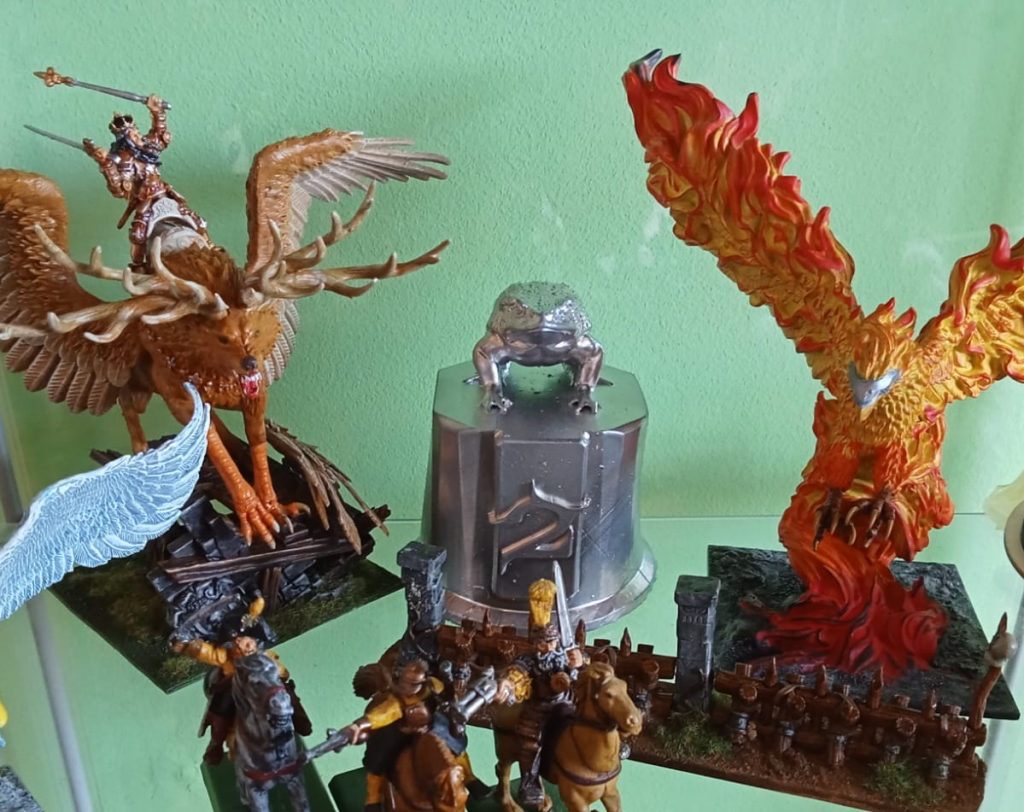
the trophy
I got a beautiful silver frog! It’s in my display case between two of my titans!
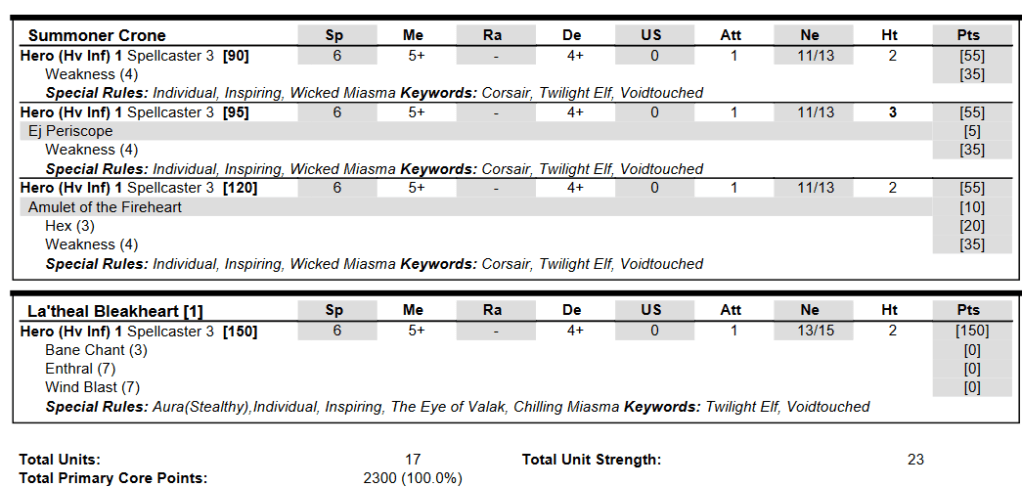
Battle 4 vs Patrick’s Twilight Kin
After the tournament finished, I was challenged by the number 1 of the Tournament, Patrick. He brought his twilight kin:

Scenario: raze
Battle
Frankly, I played a lousy battle. It was late, (we started at 20:15) lasted way too long (till after 23:00) and I was tired. I shouldn’t have done this one, but did regardless. Having faced Twilight Kin only once before, I did not know all his special rules (and I should have) and the fact that he killed over 5k points in 3 battles should have told me this is a nasty list.
Nevertheless, my list design pulled me through. His army, while having quite a few units that can do some damage, doesn’t have major damage dealers. This worked fine in the Austrian meta (which features a lot of elite armies and strong units), but doesn’t against high nerve armies. After wasting two turns shooting at his stealthy units, my infantry moved forwards, supported by knights and flying heroes and started killing his army.
I ended the game in control of two tokens, while he contested zero. Is was much closer than it would have been, would I have faced him battle one. He could have won if the dice would have fallen differently and if he would, it would have been due to my own ineptitude.
This battle was won because I know how to build an army, not because I played it right, because I didn’t.
Result
Then again, it’s great to beat the tournament’s winner after ending 2nd! In the end, it’s result that counts, right? 😉
What could Patrick have done to win?
I don’t remember enough of the battle to give strong tactical advice.
The list, however, has been analysed by my brother and myself and has the possibility to be turned into a killer. T’kin are nasty and my experience this evening convinced me of their viability. The army above needs more hitting power and there’s quite a few units that can be changed to achieve this.
Twilight Kin infantry has several nasty options. Instead of three regiments of corsairs, why not take two hordes of fleetwardens? With the abundance of weakness, these guys can be treated as phalanx def 5+ and, if you get a few points left over, the blood hex can turn them very resillent. 30 attacks/elite/CS1 makes them very killy too. The only reason you’re not taking three is due to space.
The void skiffs are good and you’ll need them for the unlocks. Again, blood hex is mandatory, harpoons however, aren’t. The navigators, good as they might be, take up a character slot. La’thael grans stealth anyhow, so two is at least one too many and maybe the 2nd is surplus too. As for the crones, you want three, but only with weakness. All the rest is wasted points. As for the goredrake, it’s okay-ish, but there are better options.
Skipping everything surplus from the above lists, you’ll get a lot of points freed up. I would spend them on bound reaper troops. (but if I do, I’ll keep a goredrake for flyer defense in addition to the phantoms)
Bonus battles
On sunday I played two battles. Instead of the army above, I took my Basileans. First I played Stephan’s ögres.
Using my Basileans (and having faced Ogres more than I’d want to admit) the game was a matter of “Line up, charge, kill”. The centre of the ogre line was smashed in turn 2, the flanks in turn 3 and four.
Respect @Stephan for taking it in stride and keeping up a sportman’s challenge.
The 2nd battle was facing Martin’s Trident Realms.
This battle was as one-sides as the previous one. Unlike the previous one, Martin played to my weaknesses and showed me every corner of the table.
While having faced the Trident Realms before, I hadn’t encountered Eckter yet. Turns out he is a hard counter to a horde of cavalry, especially combined with weakness.
Martin did everything right, kept his army compact, neutralised my cavalry and killed off the angels. Within four turns, I had just two heroes free and had to concede.
Would I have played better if I would have paid more attention? Yes, probably. Next time, Martin, I’ll give you more of a challenge. Thanks for the humiliation. I guess I needed it after five victories!
Conclusion
Regarding my tournament army, I might have found gold. I like the army, it performed well and I enjoyed playing it. Though I usually play an army for a tournament and then leave it, I might take this army for a 2nd turn.
The army does scale down well, as we usually play 1,995. Skipping the 3rd balista and the general, this army only needs to drop the bowmen (a surplus unit anyhow) to fit within the 1,995 point allotment.

One thought on “Örb wars 2 – reviewing my army”